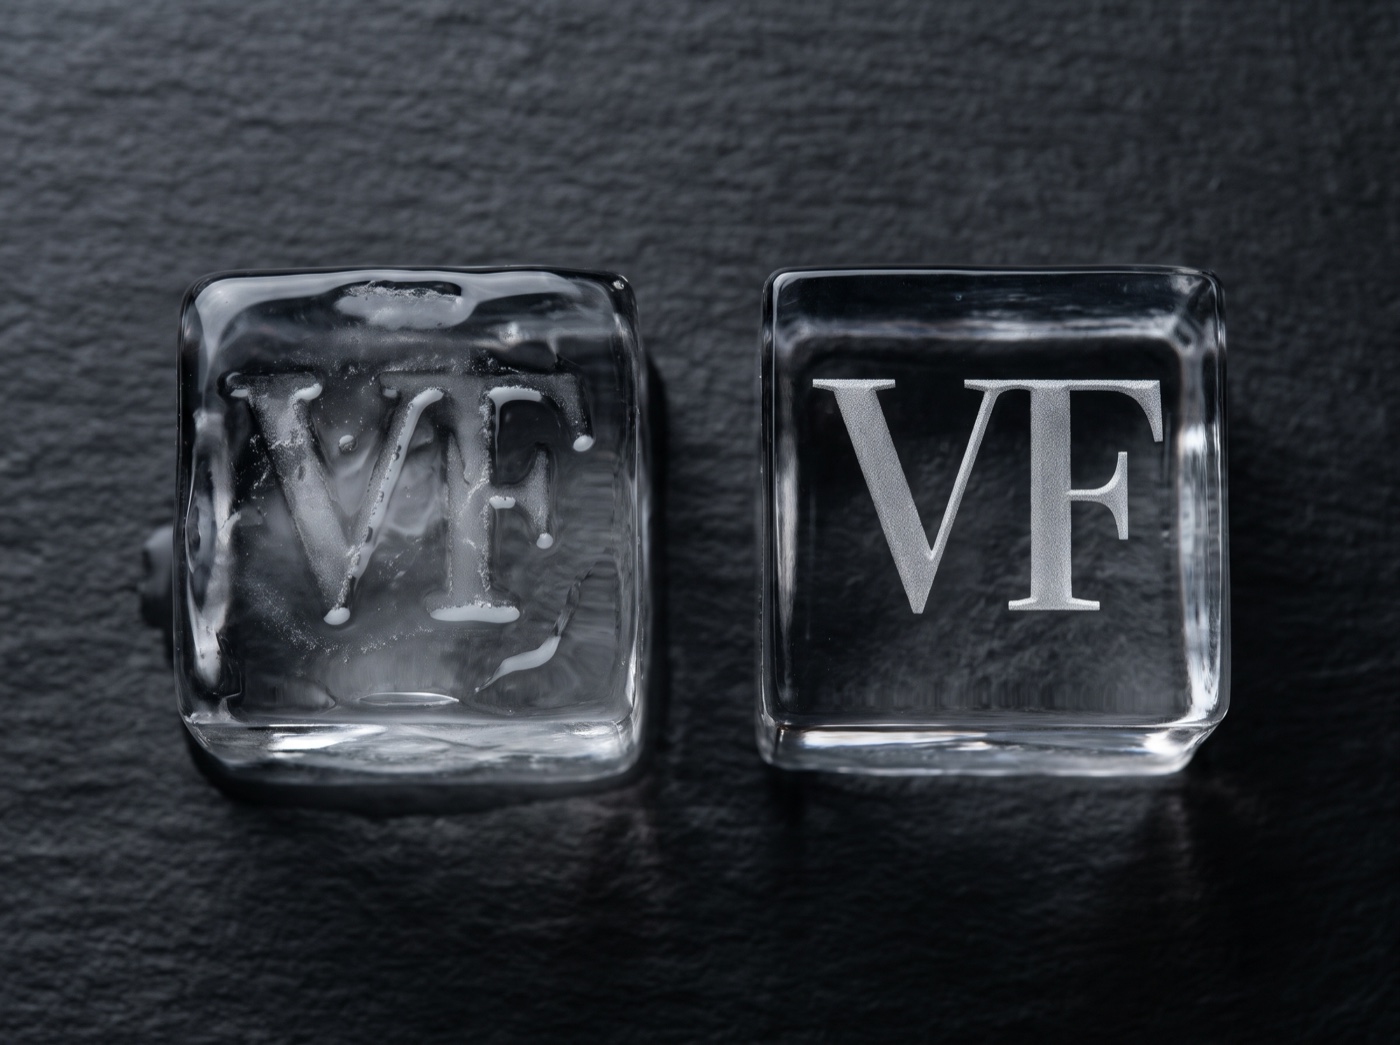
The short answer
- Shallow relief. Under 1.5 mm, meltwater pools in the recess and the background touches the ice. Target channels of ≥ 2.8 mm.
- Fine artwork. Strokes under 0.50 mm or gaps under 0.80 mm bridge shut with meltwater.
- Ice too cold. Stamping straight out of a sub-zero freezer gives frost and cracks. Use the 90-second tempering protocol.
- Long or twisting contact. Holding past about 6 seconds, or twisting the handle, smears the edges.
- Wet stamp face. Water carried from cube to cube blurs the next one. Reset with a warm towel.
The five causes, diagnosed and fixed
An ice stamp works by moving heat from the metal into the ice: the raised design melts its shape into the surface while the recessed background stays clear. A blurry impression is meltwater going where it shouldn’t. Read the pattern of what you see, find the row, and change one variable at a time.
Contact times below are starting points for a clean, room-temperature stamp on plain-water ice, not guarantees. Practise on a spare cube before service.
| # | What you see | Likely cause | Fix |
|---|---|---|---|
| 1 | Rounded, “wet” letters; background looks smeared | Relief under 1.5 mm: meltwater pools in the recess and the stamp floor touches the ice | Use channels cut to ≥ 2.8 mm; confirm relief depth before you commit to artwork |
| 2 | Bold areas crisp, fine lines missing; small counters filled in | Strokes under 0.50 mm or gaps under 0.80 mm bridging with meltwater | Thicken strokes to ≥ 0.50 mm and open gaps to ≥ 0.80 mm at final size; check the artwork |
| 3 | Frosty, powdery or cracked mark | Ice stamped straight from a sub-zero freezer | Run the 90-second tempering protocol below until the surface turns glassy |
| 4 | Soft edges all over; ghosted double outline | Holding longer than about 6 s, or twisting or rocking the handle | Press straight down 2–3 s (brass) or 4–5 s (304), lift straight up, never twist |
| 5 | Good first cube, worse with each one after | Stamp face wet, or cooled by repeated pressing | Warm-towel reset: wipe, dry, let it recover to room temperature |
Which cause to rule out first
If the bold shapes are clean but fine detail vanishes, start at cause 2: that is artwork, not technique. If everything is uniformly soft, start at cause 4 or 5. If the cube is frosty or cracking, start at cause 3. If nothing you change helps and the recess looks shallow, it is cause 1: a stamp-geometry problem, not a cube problem.
Shallow relief: why ≥ 2.8 mm channels matter
Meltwater has to go somewhere. On a stamp with under 1.5 mm of relief the recessed background sits almost level with the raised artwork, so water has nowhere to collect except against the ice, and the floor of the stamp touches the surface and softens everything around the letters. Deeper channels keep the background clear of the ice and give meltwater a reservoir below the contact plane.
Our CNC target for ice stamps is channels cut to ≥ 2.8 mm. That is a design specification; documented depth measurements from production samples will be published before orders open. If you already own a stamp, shine a torch across the face at a low angle: a recess you can barely see is a recess that cannot hold water.

Fine strokes and tight gaps bridge shut
Meltwater is not precise. A stroke narrower than about 0.50 mm, or a gap narrower than about 0.80 mm, at the finished size can fill or round off before it freezes again. Thickening lines also narrows the gaps between them, so check both numbers together.
These are screening guidelines, not universal pass/fail rules, and extra relief depth will not rescue a line that is too fine. If the bold areas of your mark print cleanly and only the hairlines fail, fix the artwork rather than the technique.
Stamping straight from the freezer: the 90-second tempering protocol
Ice at freezer temperature is brittle and usually coated in frost. A room-temperature stamp meets it with a large temperature difference: the frost blurs the detail, and the shock can crack the cube. Temper it first.
- 0–30 s: move it. Take the cube out of the freezer and set it on a dry rack or towel at room temperature, flattest face up.
- 30–75 s: watch the frost. The white, powdery bloom clears from the face and the surface turns glassy. Rotate the cube once to check the face you will use.
- 75–90 s: dry and stamp. Wipe the glassy face with a clean, dry towel, then press with a clean, room-temperature stamp.
Very cold deep-freezers, large cubes and cold rooms can need longer; our main clear-impression guide uses 3–5 minutes as a safe range. Judge by the surface, not the clock: if it is still frosty or powdery, it is not ready.
Holding too long or twisting: keep contact brief
The metal does the work, so extra time only gives meltwater a chance to spread. For brass, about 2–3 seconds is a sensible starting point; for 304 stainless steel, which conducts heat more slowly, about 4–5 seconds. As a hard ceiling, if you are past roughly 6 seconds and still see no mark, stop: the stamp has cooled or the ice is too cold, and holding longer will smear rather than deepen it.
- Hold the handle vertical and press straight down with light, steady pressure.
- Never twist or rock. Even a few degrees of rotation draws a ghosted second outline.
- Lift straight up. Dragging the stamp sideways wipes the fresh edges.
A wet stamp face between cubes: the warm-towel reset
Each press pulls heat out of the metal and leaves a film of meltwater on the face. Stamp the next cube like that and the film becomes the blur. Between cubes:
- Wipe the face with a clean towel that has been warmed and wrung out, not hot and not dripping.
- Dry it immediately with a second clean, dry towel.
- Give it a few seconds to come back toward room temperature, then stamp.
Never heat a stamp with a flame or torch. Stamp plain-water ice before the drink is poured, and keep the face clean: see our materials guide for why brass should stay off acidic or flavoured ice.
A note on the alloy
Lead-free here is a metallurgical statement, not a certification: our target alloy is a bismuth lead-free eco-brass, and an optical-spectrometer reading of a supplier alloy sample came in at about 0.0022% lead (≈ 22 ppm) against the 0.25% (2,500 ppm) NSF/ANSI 372 drinking-water plumbing threshold, used here only as a reference benchmark. That is a sample reading, not a batch report: every production batch is spectrometer-checked and its batch sheet published before dispatch.
Quick questions, straight answers
Why is my ice stamp blurry even on clear ice?
Clear ice makes a mark easier to read but does not stop blur. The usual causes are shallow relief under 1.5 mm, strokes under 0.50 mm or gaps under 0.80 mm, ice that is too cold or frosty, contact held beyond about 6 seconds or twisted, and a wet stamp face.
How deep should the channels on an ice stamp be?
Our CNC target is channels cut to at least 2.8 mm. Under about 1.5 mm, meltwater pools in the recess and the stamp floor touches the ice, softening the edges.
How long should I temper ice before stamping?
A 90-second protocol works for many cubes: move the cube to a dry rack, wait until the frost clears and the surface turns glassy, wipe the face dry, then stamp. Very cold or large cubes may need 3–5 minutes.
How long should I hold an ice stamp on the cube?
About 2–3 seconds for brass and 4–5 seconds for 304 stainless steel as a starting point. If you pass roughly 6 seconds without a mark, stop and reset the stamp or the ice rather than holding longer.
Still blurry? Check the design.
The free studio shows your artwork at its finished size and highlights thin strokes and narrow gaps before any metal is cut. No account, and your file stays in your browser.